Tuesday, October 6, 2009

It's official!

We booked our wedding venue last week. We are now officially getting married on October 16, 2010. I'm psyched. I love fall, and that should be right around peak foliage. Our venue is a small family-owned ski resort in western Mass. It's going to be just lovely with all of the leaves changed. We're hoping to have the ceremony outside,

either here:


or here:


but if it's too cold or rainy or (heaven forbid!) snowy, they also have a nice indoor backup space for the ceremony:


And this is the lodge where the reception will be. We lucked out and were able to see it all decorated for another wedding.


The best part is that this was one of both of our favorites out of the 9 sites we visited, just from a purely personal/aesthetic (non-budgetary) perspective, but it also happened to be the cheapest! Clearly it was just meant to be :)

Now we just have to decide on a menu, find a photographer, an officiant, figure out decorations, get a dress, etc., etc., etc... It's amazing how many decisions there are to make. Good thing we have a full year to do it, though I'm sure it'll just fly by!

Check out this fun little gadget we picked up for the reception.

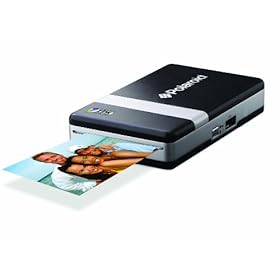
We had been talking about getting a Polaroid camera so people could snap pictures of themselves and put them in the guest book, but it turns out the Polaroids of old are no longer being made! Shocking, I know. BUT, they do have these fun little combo digital camera/mini printer thingies that fill a similar purpose. Since we already have 3 digital cameras between the two of us, it seemed a little silly to get another one, but they also sell just the mini printer. So I wrote it down in my "ideas" notebook so I wouldn't forget, and a few days later, the exact printer was the Amazon deal of the day! It was marked down to $30 from its usual $48, so of course I just had to buy it. It came a few days ago and it's so cute!

It's about the size of a mass market paperback book, maybe a little smaller. The paper that it takes is 2"x3" and has adhesive backing. So people can just print out a little pic, peel off the back, and stick it right in the guest book! I'm so excited about it. I'm thinking of setting up some kind of a backdrop for a sort of DIY photo booth. It'll be like an instant scrapbook that I don't have to spend hours upon end putting itty bitty photo corners on my pictures. (I still haven't finished my scrapbook from Ireland. So close... Oh so close...)

In other news, we finished the top for the neverending quilt! So maybe, just maybe we'll actually finish it by my self-imposed deadline of the end of this month. We already have fabric for the back, and we have the batting, but we aren't sure what we're doing for the binding yet. So that could be a hangup... I guess we'll just have to see how it goes, but the chilly weather is definitely providing additional incentive!

Friday, September 25, 2009

New Shop!

Hello there, blog readers! I have some exciting news to share today...

I just opened a second Etsy shop! I know, I know. What am I thinking, right? I already have one shop that I haven't added any new items to in ages (but I did just sell something last week!), not to mention I'm a full time student and planning a wedding. But hey, why not? :)

Besides, this new shop is for my photography, and it's a whole lot less time consuming to get a print of a photo I've already taken than it is to, say, crochet an amigurumi. I still have a lot to do as far as creating a profile, filling in my policies, making a banner/avatar, and of course listing more items. I only have two up so far, but will add more gradually (to keep me near the top of the search results!)

Here's a sneak peak for you folks, because you're my oh-so-special blog followers :)


Oh and if any of you happen to be knowledgeable about flowers, I'd love it if you could tell me what types these are! I know the red one in the middle is a hibiscus, but I have nooo clue about the other ones.

If you wanna check out the shop so far, it's http://ImageDelights.etsy.com (to go with my other shop name, Crafty Delights).

Friday, September 18, 2009

Yoga Mat Roll-up

Check it out! Busy as I am, I somehow managed to find the time to create this handy little gadget for my yoga mat. I signed up to take a yoga class at school ($5 a class! How could I resist?), and I realized that I had no good way of carrying my mat. I'm also somewhat averse to the idea of a drawstring yoga mat bag because it makes me think of trying to stuff a rolled up sleeping bag into it's carrying bag. Granted, a yoga mat is probably less prone to explosion than a sleeping bag, but I wanted to try something different. So here's what I came up with.

Here's the outside, for which I used a nice chocolate brown corduroy fabric that's been hanging around for a while. I actually bought it intending to make a skirt out of it but I couldn't find a pattern that I liked. You can see the three buttons on the outside, but you can't see the elastic loops on the top edge very well in this picture. And then there's a wide blue shoulder strap sewn in between the outer and inner fabrics.


Here's what the inside looks like. It's just a solid blue cotton that I happened to have on hand (and happened to match the strapping that I had). The little buttons you see in this picture are anchors for the buttons on the outside to help them support the strain of the elastic loops, which you can see on the bottom edge in this picture.

So the idea is I put the roll-up thingydo flat like this, stick my rolled up mat on top, fold over the top edge and then the bottom edge and hook the elastic loops around the buttons.


And then, I get this. I was a little bit paranoid about the mat slipping through since there's no bottom, but it worked out just fine. The key is to make sure the buttons are placed far enough from the edge so that the elastic is pretty taught when looped around them.

And, a bit of wedding news before I go... Cale and I are going to the Berkshires (the mountains in western Mass) this weekend to look at wedding venues! And by this weekend, I mean today. As in, we're picking up the rental car in 2.5 hours (gee, maybe I should get off the computer and finish packing...). My parents, my mom's sister, and my 14-yr old cousin (the daughter of another of my mom's sisters) are all joining us for the weekend. I'm excited and I think it's going to be great fun, but I just home it doesn't get too crazy with so many different people (and opinions!)

Tuesday, September 8, 2009

Loofah in Spa

Remember how I promised way back when to show you folks a picture of the loofah I made with Naturally Caron Spa yarn? Well, here it is. I forgot to take a picture right after I finished it, so this was actually taken after I had been using the loofah for about a week, and after it had gone through the wash (gentle cycle) and dryer (low-med heat).

You can see that it keeps its shape quite nicely, definitely better than the Bernat Cool Crochet. I'm sure that's because the yarn is thicker so the loofah comes out much denser. Another consequence of that is that it doesn't lather up quite as well as the Cool Crochet. It's a bit of a trade-off really. Personally, I think I'd rather have a better lather than a more resilient shape, but that's a matter of preference.


In other news, today is my first day of class for my Masters in Public Health! Eek! Wish me luck... I'll try to keep up with posting at least once a week, but with being a full time student again, and planning a wedding, I can't make any promises! Just know if I've disappeared for a time that I haven't forgotten about you, and I will be back... eventually :)

Tuesday, August 25, 2009

Hello Again, Readers!

Contrary to appearances, I have not dropped off the face of the earth. I've simply been busy travelling about Ireland, getting engaged, and turning 25!

Here is the first picture of me and my fiance as an engaged couple, taken just a few minutes later.


And here's a picture of where we were when he proposed. See the itty bitty tower on top of the very big cliff? Yeah, that's where we were. Romantic, eh? :)


More posts to come soon...

Thursday, August 6, 2009

Loofah Yarn Recommendation!

This has been a long time coming, but I finally have a yarn substitution recommendation for use with my Perfect Loofah pattern... Spa by Naturally Caron. Really, with a name like that, how can you go wrong? But I wanted to make a full size loofah, test it out for a bit, and wash it before making a recommendation. Anyway, here are some key facts about the yarn.

~ It's 75% acrylic, 25% bamboo. I know there are knitters who are anti-acrylic, but this yarn is so soft. It feels great on the skin! Unless of course you enjoy that scratchy scrubby feeling of nylon mesh.

~ It's DK weight. This loofah came out much fuller than the ones with Cool Crochet (which is sport weight). It's kind of nice because it helps it keep its round shape better when wet, but it still lathers up nicely and dries out quickly (I doubt if this would still be true if the yarn had a high cotton content). That said, I would definitely not go any heavier (ie worsted weight), unless you enjoy spending money on soap.

I've been using a loofah made out of Spa for about a week or so and I'm really happy with it. I washed it yesterday (as a test - it didn't really need it yet) in the machine on the gentle cycle and tumble dried on medium heat, and it held up great. There's no noticeable wear or anything.

I will try to get a picture, but my laptop is being repaired (been at the shop two weeks tomorrow and they're still waiting for the part), and last time I tried to install the programs I use on this computer (Cale's desktop), it decided it didn't want to start up and I ended up spending half a day trying to get it to work again.

Thursday, July 23, 2009

EtsyKids July Challenge

Every month, the Etsykids Street team has a design challenge reflecting a certain theme. For the month of July, the challenge was "School Days" - design something for kids going back to school. Since I just joined the team in June, this was my first challenge and I was really excited to participate. I wanted to design something that would fit the theme, but would also fit in with the other items in my shop.

So I came up with this little Fuzz Monster Key Chain:


I wanted to do a plush key chain because I thought it would go better in my shop (as opposed to something totally different like pencil cases, etc. ) And anyway, no backpack is complete without a keychain or two. Initially I was thinking of doing a panda head or something along those lines, but then I thought of doing a mini fuzz monster on a key ring, and I loved that idea. I've sold two different Fuzz Monsters in my shop already and they've gotten lots of hearts, so I thought this would be a great way to put a new twist on an item that's already part of my shop's identity.

Here are a couple of my favorite entries from other Etsykids team members:


I find this alphabet puzzle from PuzzledOne so clever because it gets kids thinking in two different directions - language and visual-spacial skills.


And how can you not love the idea of these reusable sandwich/snack bags from CountingBunnies? If you imagine that on average each kid uses 2 baggies a day in his or her lunch (one for a sandwich, one for a snack), times 5 days a week, times 40 weeks in a school year, that's 400 baggies a year! Now multiply that by the number of kids bringing their lunch to school, and that is a lot of plastic going into the landfills!

Voting is going on NOW, so pop on over to the Etsykids team blog and cast your vote!

Wednesday, July 22, 2009

Return of the late night visitor

Some of you might remember my post a couple weeks ago about being woken up in the middle of the night by my cat having a panic attack about a raccoon that was peering in the window. Well, Sunday morning, I opened the blinds of that same window (the one off the fire escape), and this is what I saw.


The little bugger was getting a good day's sleep right on my fire escape, and using my potting soil as a pillow to boot. Note the rear paw hanging down between the slats of the fire escape... relaxed much? I snapped a couple photos, and then thought well, I don't exactly like having a raccoon using my fire escape as its bed. So I banged on the window, and after several times, I finally woke him up, and got this reaction...


"Excuse me. I'm trying to sleep here!" Continued banging just prompted more "why are you bothering me?" looks, so I gave up. He wasn't really doing any harm anyway. Within a few minutes, he was sound asleep again, this time curled up like a cat or dog.


He's actually kind of cute, no? Much less frightening in the daylight, that's for sure. The little fellow ended up sleeping there most of the day, at least 4-5 hours, and Marlie (my kitty) never even noticed he was there.

Tuesday, July 14, 2009

Etsy's Weekend Deals - The Numbers

For those of you who don't know, every day Etsy sends out an email called "Etsy Finds" showcasing some number of items from sellers on Etsy. (You can sign up for this and other email lists here). On Fridays, the Etsy Finds email always focuses on "Weekend Deals," which may center around some particular theme (spa/relaxation, summer jewelery, etc) or a certain type of deal ( % Off, Free Shipping, BOGO, etc.)

Well last Friday, July 10th my Romper the Rhino made it into the Weekend Deals email. Here's a screenshot of part of the email, showing Romper and a few other lovely items from fellow Etsians.


So what kind of traffic did I get from being in this email? Lots. and Lots. We're talking a month's worth of views in a single day. It was amazing. I was sitting on Craftcult, refreshing the page and watching my item views and shop hearts go up and up. Yes, I really am that much of a dork, and to prove that point further, I'm now going to launch into a bunch of numbers because I love data.

First some background information for comparison purposes...

This is what my visits looked like for the month of June


So you can see that during the month of June I received a total of 954 visits and 2,289 pageviews. That averages out to 31.8 visits and 76.3 pageviews per day.

Now, here is what my views looked like from Friday, July 10th (the day the email went out) through Monday, July 13th (yesterday).


On Friday alone, I received 711 visits, a 2,136% increase over my average daily visits in June. And I received 2,411 pageviews, a 3,060% increase over my average daily pageviews, and 5% higher than the number of pageviews I received during the entire month of June.

Also interesting is that during these 4 days, the number of pages people viewed per visit was higher (3.32 versus 2.40) and my bounce rate was lower (40.98% versus 58.49%) than average. So not only did I get waayyy more visitors, but those visitors viewed more pages, and fewer of them left immediately.

As for shop hearts, between 12 noon on Friday and 11:59pm on Monday, I received 68 new shop hearts. Prior to then I had 108 hearts, so that 68 hearts amounts to a 63% increase in just 3.5 days. Considering it took me over four months to get the first 108, that's a big jump in hearts! Even better, out of those 68 hearts, 41 (60%) were from non-sellers. My experience has been that non-sellers are more likely to buy from my shop than sellers - only 2 of the 11 people I've sold to have been sellers.

So while I sold 2 toys and 1 pattern over the weekend, the big question is whether this will have any long term impact on traffic and sales in my shop. My suspicion is that it will, because there are now 68 more people who have my shop easily accessible in their favorites, so some of them are bound to come back. It also seems to me there's a bit of a snowball effect when it comes to awareness - the more people know about your shop, the more people will find out about it. And I now have A LOT more people who know about me.

It looks from the second graph I posted that my views haven't levelled off from their peak yet. While they have dropped significantly from Friday's crazy high level, they are still much higher than my average, and are still decreasing. Sunday I had 168 visits, which dropped to 130 visits on Monday, still 309% higher than my June daily average. I will keep an eye on my Google Analytics and post again after things level off and I can determine whether or not there's a long-term increase in traffic.

One final note (and this is the part you want to read!)...

If you want to get in the Etsy Finds Weekend Deals email on Fridays, search the Etsy forums for "weekend deals" and you'll find the threads where you can submit your items for inclusion. While every other day the Etsy Finds items are picked in some secretive mysterious way, on Fridays all items come from these threads. Make sure you have something that fits the theme (if applicable), and follow the rules in the initial post or you won't get picked. Excellent photos are also essential.

Thanks for reading! Feel free to post with any questions or comments!

Thursday, July 9, 2009

A Midnight Fright

Okay, it wasn't midnight... I was still awake at midnight... but it sure was a fright. I was woken from a dead sleep by my cat Marlie making an awful yowl, the kind that makes your heart beat three times faster because you know something is wrong.

I sat bolt upright, looked at the clock, 1:30am, and waited... was I dreaming? Did I imagine it? Then she made the noise again. No, clearly I was not imagining it. I jumped over the headboard to the window where the noise was coming from. I thought maybe she was stuck and was struggling. It sounded like she was in pain.

I get over to the window to see that she's between the blinds and the window, so I pull up the blinds not really knowing what I'd find. Well Marlie just jumped right out of the window onto my desk, and what do I see? A raccoon. With its face right up against the window, peering into the bedroom.

Well, to be honest, I was more than a little freaked out. I dropped the blinds back down so I wouldn't have to see it, and then I thought gee, maybe I should try to scare it away. So I banged on the window (through the blinds), then picked the blinds back up and it was gone.

So Marlie was not hurt, just frightened. I think she was hanging out in the window when the raccoon showed up and scared the bejeesus out of her, and since she was behind the blinds she couldn't bolt and started to panic.

I have no idea how that raccoon got up onto our fire escape, but I do know I won't be sleeping with the window open anytime soon!! Yikes, last night could've been a lot worse if it were screen instead of glass between Marlie and the raccoon!

In my state of mind, the last thing I was thinking of was to take a picture, and I probably couldn't have gotten one if I tried, but I just can't have a photo-less post! So here is a picture of Marlie not being scared by a raccoon. That's my open textbook she's lying on... apparently I was paying too much attention to it, and not enough to her.


Monday, June 29, 2009

Tutorial: Use Amazon to create an Etsy wishlist

Have you ever wished you could make an Etsy wishlist? Well, thanks to Amazon's universal wish list button, you can now do just that. It takes about 10 seconds to set up, and is easy as pie to use. Ready to get started? Here's what you have to do.

Step 1: Go to www.amazon.com, hover over "Your Lists" in the upper right corner, and click on "Wish List"


Step 2: From your Wish List page, click on the "universal wishlist box on the left side of the page.


Step 3: Click on the button that says "Get the Universal Wish List Button"


Step 4: As instructed, click and drag the "Add to Wish List" button to your bookmarks bar (right underneath the address bar). The button will stay in this bar, and it will be there whenever you open your browser.


Okay, now you're set up with the Universal Wish List Button. The remaining steps will show you how to add things to your wish list.

Step 5: Go to etsy and find an item that you'd like to add to your wish list. Check out these awesome green earrings from Etsy seller echosofspring. Click on the "Add to Wish List" button that you just put into your bookmarks bar. A window looking like the one below will pop up.


Step 6: Fill in any information that you would like to add. There are boxes for Price, Quantity Desired, and Comments (this is a good place to specify size or color). You can also choose a different picture from the page by clicking on the arrows below the picture, where it says "Is this the right image?" When you are finished adding the information you would like to include, click on the yellow "Add to List" button.


Step 7: A confirmation message will appear letting you know the item has been added. If you would like to go to Amazon to see your list you can click on "View this List." If you want to add more items, or go back to what you were doing, just click on "Continue Shopping." I clicked on "View this List" so you can see how the item shows up on your wish list.


Step 8: There isn't really a step 8. This is just a picture of my wish list with the item added. Over here you can change the quantity desired, priority, and comments. You can see that the list shows the price that I entered, the title of the item and seller, and a direct link to the listing.


Of course, since this is a Universal wish list button, you can use it to add items from any website you visit. You can see on mine that I have an item from freepeople.com underneath the earrings I just added, and then I have another item from Etsy underneath that. I prefer to keep everything on one list so that people only need to go to one place if they're looking for gift ideas for me. However, if you would like to make a list of exclusively Etsy items, you may do that as well. Amazon allows you to create multiple wish lists and name them as you like. So you could create a new wish list, name it Etsy Wish List (or whatever you prefer), and use it for only Etsy items. That way if you wanted those items separate for whatever reason, you would have that option.

I hope you have found this interesting and useful. Please feel free to comment below if you have any questions!


Tuesday, June 23, 2009

The Importance of Lighting

I learned something new today, thanks to etsy seller BuyMyCrap. She started this thread about using Ott Lite bulbs for photographing items, and even let us know the bulbs were on sale at Home Depot for only $6.

Well, I don't have a Home Depot nearby - there are not many big box stores in Manhattan, at least not around where I live - but after reading over 20 pages and 200-something posts, I just had to find some of these bulbs.

So what's so special about them? They are "full spectrum" light bulbs. I can't explain the science behind it, but they're designed to simulate natural sunlight. Apparently they've been marketed to crafters for doing detail work and being able to accurately match colors at night. It just makes sense that they'd be good for photographing said crafts once they're done.

Thus I embarked on an expedition to find these bulbs (or something similar). There are several small hardware stores within walking distance of my apartment, so my plan was to check those, but I remembered that I needed to pick up rubbing alcohol, so I popped into Duane Reade on my way. And what the heck, they sell light bulbs, it's worth a look, right? Much to my surprise, not only did they sell GE brand full spectrum light bulbs, they actually had some in the store brand! And really, at $4.49 for a 4-pack, how could I not try them?

So I picked up a pack of 100W (the one drawback - incandescent bulbs... the real Ott Lites are fluorescents) and hurried home to try them out.

The one item that I've struggled the most with photographing accurately is my Perfect Loofah in Flamingo Pink. It's a really bright pink, but the pictures kept coming out rather salmon-colored.

Here's a Before/After collage of the pictures for my listing. This is the exact same loofah, taken in the same light box with different light bulbs. The pics on the left were taken using standard compact fluorescent light bulbs. The ones on the right were taken with my Duane Reade store brand full spectrum light bulbs.


Amazing difference, isn't it?

Thursday, June 18, 2009

The Neverending Quilt

I can't even tell you exactly when Cale and I started working on this quilt. But I know we were still living in Boston at the time, and I think it was at least a few months before we moved to NYC. So... since we just renewed our lease, that means it's been over a year. And it's not a complex quilt. In fact, it's a really simple pattern. But we have a tendency to get sidetracked.

Basically, we've gotten as far as we have by working in spurts of diligence. We'll go through a week or two when we work on it a little bit every night, and then we just don't. For a few months. And then one of us will be inspired to go back to it, and we go through the same cycle again.

Our last "on" period was sometime in the dead of winter, and we were making such good progress that we thought we might finish before the weather got too warm to use it, and we even bought a gigantic roll of batting in anticipation. Well, now that batting has been taking up a good portion of our limited storage space for a good 3-4 months.

Well I got inspired again, after unearthing the quilt pieces when I was cleaning a few days ago, so we're working on it once again. I'm hoping that putting this out there in the blogosphere will help me keep up the momentum to actually finish this thing. We're about 3/4 done with the top, and then we need to assemble the layers, so if we keep at it we should be able to finish before the weather gets cold again.

I'm pretty sure I said that to myself around this time last year, but now I'm going to make it an official goal. This quilt will be complete before the end of October. Oh boy, now I've said it. Can we do it??? Feel free to leave me words of encouragement!

And now for some pictures of the infamous quilt...


It's got a two-way gradient thing going on, so the green gets darker as the brown gets lighter. That bit wasn't in the pattern - the pattern just had blues and creams randomly distributed. And man, it took us for.ev.er. to pick out fabrics, and decide on the layout of the blocks. I'm liking the look so far, though. Can't wait till I can sleep under it!

Wednesday, June 10, 2009

Going Reusable

Last night, my boyfriend and I demolished almost an entire roll of paper towels. I'll admit we don't clean as often as we should, but part of the problem is our water. I think it must have rust or something in it because we get orange buildup in our shower, sink, and toilet. And anywhere that the water pools (like the base of the shower doors and behind the sink faucet) the orange buildup turns into orange slime. It is not pretty. In fact it's pretty damn gross. I hate looking at it, but I hate the thought of cleaning it even more. So I procrastinate.

Well yesterday I finally bought some Comet disinfecting spray cleaner, versus our "Kitchen and Bath" spray from the dollar store (I'm not entirely convinced it's any more effective than water), and I went to town on the shower. I think I used nearly half the bottle on this one cleaning.

Between cleaning the shower and wiping up the excess water on our freshly mopped wood floors, using up an exorbitant number of paper towels, we realized we have a problem... We have no rags.

But this is a solvable problem. All that is required is a bit of cheap cotton yarn and a few hours time. Then I figured, hey, if we're gonna be eco-friendly and make reusable cleaning cloths, why not go all the way and make them from organically grown cotton? So that is exactly what we're doing. I ordered two 100g balls of this undyed organic cotton yarn from knitpicks for just $10.


I'm already planning what sizes to make and how to differentiate between things that can be used on dishes, and things that can be used on floors and toilets. I think I'll make a few fairly small round crocheted cloths to be used as dishcloths. Then I'll make a few small square knitted cloths in a nice textured stitch like moss for general cleaning and scrubbing, and then one or two larger rectangular (also knitted) cloths for such things as wiping up mop water, cleaning spills, etc. It would be nice if I could differentiate with different colors too, but they only had the darkest shade available, and I was too impatient to wait for the other ones to become available :)

And so I am trying to make my life a little greener, a little bit at a time.


Wednesday, June 3, 2009

Free Pattern: The Perfect Loofah

At long last, here it is... the pattern for my Perfect Loofah! But first, some pictures.


The most important component of this pattern is the yarn. I used Bernat Cool Crochet, which unfortunately has been discontinued. Here are the things that make this the perfect yarn for The Perfect Loofah:
1. Cotton is ridiculously absorbent. Nylon is not. This yarn is 70% cotton and 30% nylon, creating a nice balance between being soft (yay cotton!) and not sucking up all your soap never to be seen again (yay nylon!).
2. Nylon is resistant to mildew/mold. This is very useful for something that's going to be wet a lot.
3. It's sport weight. Worsted weight is just too heavy to make a good loofah. You need some air between the stitches in order to create suds.
4. Did I mention nylon dries faster than cotton? I guess this is a subsidiary of #1. The low absorbency of the nylon helps it dry out between uses.
5. It's machine-washable. The label says "dry flat" but seriously, I'd like to see you try to get a loofah to dry flat. I test washed mine before putting my first one up for sale and I put it in the dryer. It came out okay but looking a little rougher, so I'd recommend hanging it up to try. Low heat tumble drying might be okay - mine went in on permanent press. 

Right, so the perfect yarn is no longer for sale, so what the heck are you supposed to do then? Well, if you're super lucky, you have some Cool Crochet hanging out in your stash, but if not, I've seen it for sale on both etsy and ebay. But I bought it, so it might be all gone :). You might also be able to swap with someone on Ravelry. (Hmm... maybe I shouldn't be telling you all this). 

I have had a lot of trouble finding another yarn that is a sport (or fingering) weight cotton/nylon blend that doesn't have something else in it - like wool. It's possible that there are sock yarns out there that might fit the bill, but I haven't found any yet. Another option might be trying a cotton/acrylic blend. The acrylic should still help with the super-soap-sucking power of cotton, make the loofah lighter/less dense, and help it dry faster. But, as far as I know it's not mildew-resistant. 

If you try a different yarn, PLEASE  let me know how it works out for you! I'm making these for my etsy shop, and I only have so much Cool Crochet, so having another type of yarn to use would be awesome. 

And now for the actual pattern. 

I ask that you respect the time and creativity I put into developing this pattern by giving credit where credit is due. Please contact me first if you are interested in selling your finished products. Thanks.


Materials:

35 g Bernat Cool Crochet (see above for reasons why this is the perfect yarn)
Size I9 (5.5mm) crochet hook
Yarn needle


Abbreviations:

st: stitch ch: chain sl st: slip stitch dc: double crochet


Instructions:

ch 4, form a ring by joining with a sl st in first st 
ch 40 
sl st into center of ring (this forms the loop for hanging the loofah)

R1: ch2, dc 4o into center of ring, join with sl st (4o st)
R2: ch2, dc 3 in each st around, join with sl st (120 st)
R3: ch2, dc 3 in each st around, join with sl st (360 st)
R4: ch2, dc 3 in each st around, join with sl st (1080 st)

Bind off. Weave in ends. 

Wednesday, May 27, 2009

Coming Soon: Fabric Gift Wraps for WEDDINGS!

I've been wanting to offer fabric gift wraps for weddings and bridal showers for quite some time now, but the challenge was in finding the appropriate fabric. Weddings are one of those occasions where people tend to put a little more effort into having a nicely wrapped gift than say, birthdays or Christmas. To be honest, I'm not entirely certain what the reason behind this phenomenon is since the bride and groom tend to be a little distracted by the whole getting married thing ~ maybe it's because nobody wants to be "that guy" who has a gift wrapped in old newspaper being displayed throughout the entire reception among all the nice, aesthetically pleasing, store-wrapped gifts. 

Whatever the reason, it seemed like if I could find the right fabric, these could be a big hit and maybe even turn people on to my fabric gift wraps for other occasions, too. The problem was that my normal go-to fabric thus far has been fun cotton prints. Wedding-appropriate cotton prints are remarkably difficult to find, and even if I could find them, they would probably be white, and white cotton is pretty much completely see-through - obviously not ideal for gift wrapping. I'd have to do a lining, which would mean extra fabric and extra work, considerably raising the price relative to my other wraps.

And then... I had an idea...

Satin.

It's perfect. It comes in beautiful shiny white and silver brocades, pretty patterns that are so nice for weddings. AND, best of all, it's nice and thick, so even if it's the whitest white, it still won't be see-through. Bingo!

I was passing by a fabric store while I was out and about this weekend, and popped in to see if they had what I was looking for, and I found these two.


One is a shiny white satin brocade with a medallion pattern. The other is a lighter satin in gorgeous pale lavender with floral vines. Here's a closer look. Aren't they just lovely? 


Saturday, May 23, 2009

And the Winner Is...

Congratulations to Salad for Breakfast, the soon to be proud (I hope!) owner of a free fabric gift wrap. Yay! Woohoo! Way to go! (Is that enough excitement?) 

I used the random name picker fruit machine found here to choose the winner. I thought about writing down all the names and putting them in a hat or some such thing, but I figured somebody *must* have written a program for it - and sure enough I found one. Speaking of random name pickers, Elfster is a fantastic site for administering Secret Santas. Yes, I know it's May, and I realize that anyone who reads this will probably forget about it by the time it would be useful but I just thought of it and wanted to share. We used it for my family's swap last year, and it was the first time in as long as I can remember that the Secret Santa was actually *secret.* I also used it to organize a long-distance swap between my college friends who are now scattered around the country. Check it out! It's fun :)

Now that I've gotten completely sidetracked... back to the contest. Salad for Breakfast will be receiving a medium fabric gift wrap and ribbon, in this lovely floral print that she selected:


Many thanks to everyone who entered and helped me decide what color background to use for the mice - PINK it is! with orange a close second. Now to change the photos in my shop...

For those who didn't win, I'm sorry :( ... BUT you can sign up to follow my blog, so you can be the first to know the next time I have a giveaway!

Thursday, May 14, 2009

DIY Light Box & Gift Wrap Giveaway!!

If you're not interested in my homemade light box and you're just here for the give-away, scroll down until you see the three pics of fuzzy mice - you'll find the details there. For the rest of you, here it is...

I found the instructions for this here (many other useful articles on this site as well) and I thought it could be really helpful for getting better pics for my etsy shop. Pretty much everyone will tell you that natural light is the best for photographing items, and while that is mostly true, natural light is just not a reality for some of us. So the light box is a pretty good alternative. I looked at some of the collapsible light tents for sale, and they are soo expensive! Especially for something that strongly resembles the kitty tent I bought at walmart for less than $10 - except it's white.  Thank heavens for DIY!

The box I used was a rectangular Fresh Direct box - it was the deepest one from my latest grocery delivery (dimensions are 18w x 14h x 10.5d). The tutorial recommended as square a box as possible, but I don't think mine suffers any from being non-square - though more height and depth would allow me more space to photograph larger items. 

I had never heard of bristol board before, but I went to an art supply store and bought some sheets of standard poster board - not sure if it's the same thing, but it worked just fine. I bought three sheets of white (only used two) and four different colors for backgrounds - pink, orange, purple and brown. The only muslin fabric I have is off-white, so I just used plain white printer paper on the sides and an old white T-shirt for the top. 

The instructions in the tutorial were great - really detailed and easy to follow. Cutting the box took me a while, probably because I was using scissors most of the time. I switched to a knife when I was cutting the top off the box and it was soo much easier - I wish I had used it from the beginning. Two sheets of white posterboard was more than enough to cover the inside of the box and make a background.

All in all, I paid a little over $8 to make this light box - including 5 different backgrounds.
- Box: Free
- Tape, scissors, printer paper, old T-shirt: Free 
- Poster board: $0.85 per sheet (white) and $1 per sheet (colored) + tax
- Glue stick: $1 + tax

Here is a sample picture of one of my most difficult to photograph items - a fuzzy catnip mouse. I think it came out a lot better than the pics I currently have up, and the colors are very true. 


And now for the giveaway details!
All you have to do to enter is post a comment here letting me know which of the above backgrounds looks best with my fuzzy catnip mice (orange, white, or pink). One person will be chosen at random to win *** a free small, medium, or wine bottle sized fabric gift wrap!***

To check out the wraps I have for sale, click here for the fabric wrap section of my etsy shop. Let me know if you have a preference for size, color, and print, and I'll try to accomodate you. For those too lazy to check them out on my shop (seriously, you should! there's lots of info there! - and I'm too lazy to re-type it all here :p ), here's a sample pic. 

Make sure you leave me your email, or else I won't be able to notify you if you win!! Don't worry, I promise I won't spam you.  :)


Wednesday, May 6, 2009

Loofahs Galore

After several attempts, I have finally created the perfect loofah - at least, I think so. It's been a bit of a crafting adventure with trials and errors, but I am quite pleased with the end result. The first attempt (first pic below) was inspired by my math geek bf who introduced me to the concept of the hyperbolic plane. I still don't really get the exciting math behind it (something about lines? I dunno), but I thought gee, that sure looks like a loofah. So here's the first one, which was done in worsted weight 100% cotton yarn, single crocheted in spirals with lots of increases. It came out looking fun (albeit a tad small), but when  I tried to use it in the shower, it acted much more like a washcloth than a loofah - by which I mean it ate my soap. 


Enter Loofah number two. This time, I scouted out the interwebs for a thinner yarn, looking for sport or fingering weight, and preferably a cotton blend rather than 100% - perhaps some nylon or acrylic content to make it less absorbent and quicker drying. AnnieKints, a fellow etsy seller, had exactly what I was looking for. In her destash, she had one 50g ball of Bernat Cool Crochet, a sport weight, 70% cotton 30% nylon blend. Bingo. 

So I crocheted up my second loofah with the new yarn, this time using a larger hook, double crochet, and more increases. And the conclusion is... it works. The yarn is perfect. It takes only a little more soap than one of the cheap-o nylon mesh loofahs you can buy at the drugstore. It doesn't get as sudsy as those, but it's plenty sudsy enough and sooo soft. I've been using it for the past few weeks and I love it - functionally. Aesthetically, it still left a little to be desired. I did it in spirals and just kind of ended when it seemed big enough, which gives it this weird lopsided look. It's good enough for me, but not good enough to sell. 


So I started loofah the third, using the same cotton/nylon yarn, also using double crochet and the same size hook. It was coming out great, much rounder and loofah-y-looking than number two... and then... I ran out of yarn. Sigh. Fifty grams does not go nearly as far as I would like it to, and these loofahs use up a surprisingly large amount of yarn.

Sadly, there was no more of this yarn to be found on etsy, but I did find an ebay seller who had a bunch of skeins in stock. But it was a new auction with 5 days left. Boo. I prefer "buy it now" listings - yay for instant gratification - especially when I need it to finish a project I've already begun. 

I won two of the four auctions, for a total of 10 skeins of this stuff - 4 in the cream color I was using and 6 more in 4 different colors, which just arrived today. Here's the whole lot, pictured with my mostly complete loofah number three. 


With 10 skeins of this, and each skein making approximately two loofahs, I am soon to have loofahs out the wazoo (or is it up the wazoo? I dunno). The purple's pretty dark so I definitely want to test it myself to see if it runs before putting one in my shop. Also, I am intending to make the pattern available on here for free once I get it finalized. But first, I have to finish loofah the third, which is part of a shamefully late birthday present for my cousin (along with some whipped clean body wash from another etsy seller - GudonyaToo. I haven't tried any of their products yet, but it smells yummy)

Tuesday, April 21, 2009

Done and Done


Before: 

After:

Okay, I know my closet is still a mess, but what else would you expect for an apt in NYC? And in any case, it's a definite improvement. Every little bit helps. 

I did end up finishing off the skein of yarn I was using, and the end result was about 20" (it stretched another inch or so when I stuffed it), and it fit 25 plastic grocery bags. Here's a close up of the top and the bottom.